


Whether you’re selling at a retail counter, sending invoices, running events, or accepting donations, QR code payments offer one of the fastest ways to collect money without building a full checkout experience.
They’re easy to launch, simple to manage, and convenient for customers to use. Instead of going through a long checkout flow, customers can simply scan a QR code that opens a payment page in seconds.
Both businesses and consumers appear to appreciate this low-friction experience, with QR code payments expected to grow at a CAGR of 19.9% through 2033.
If you’ve already decided to take part in this growth, your next question might be: How do I create a QR code to accept payments?
This guide answers that question with a simple step-by-step walkthrough.
Key takeaways
- Choosing the right provider matters
Features like local payment methods, mobile checkout quality, and settlement speed can directly affect conversion rates and customer experience. - QR code payments are easy to set up
Most businesses can launch QR payments quickly without advanced technical work or custom integrations. - Mobile experience is critical
Customers expect QR payment flows to load quickly and work smoothly on smartphones. - QR codes work across multiple channels
Businesses can use them in stores, invoices, events, restaurants, social media, and messaging apps. - Paypercut simplifies QR payments in Europe
Paypercut helps businesses create payment links and QR codes, support local payment methods and BNPL, and accept payments across European markets from one platform.
How do I create a QR code to accept payments?
Creating a QR code to accept payments doesn’t require advanced technical knowledge. The step-by-step breakdown below explains this process in more detail.
Step 1: Find a provider that supports QR payments
Creating a standard QR code can be done with dozens of free online generators. But for a QR code to actually accept payments, it needs to be connected to a payment provider that can process the transaction behind the scan.
In practice, this usually means working with a payment service provider (PSP) or payment platform that supports QR-based payments.
While QR payment support is the minimum requirement here, it shouldn’t be the only thing you evaluate.
Most providers offer much broader payment functionality, and the differences between them can have a significant impact on checkout performance, operational workload, and customer experience.
The table below highlights some of the main factors merchants should compare before choosing a QR payment provider.
Step 2: Complete provider onboarding
The exact onboarding process varies by provider.
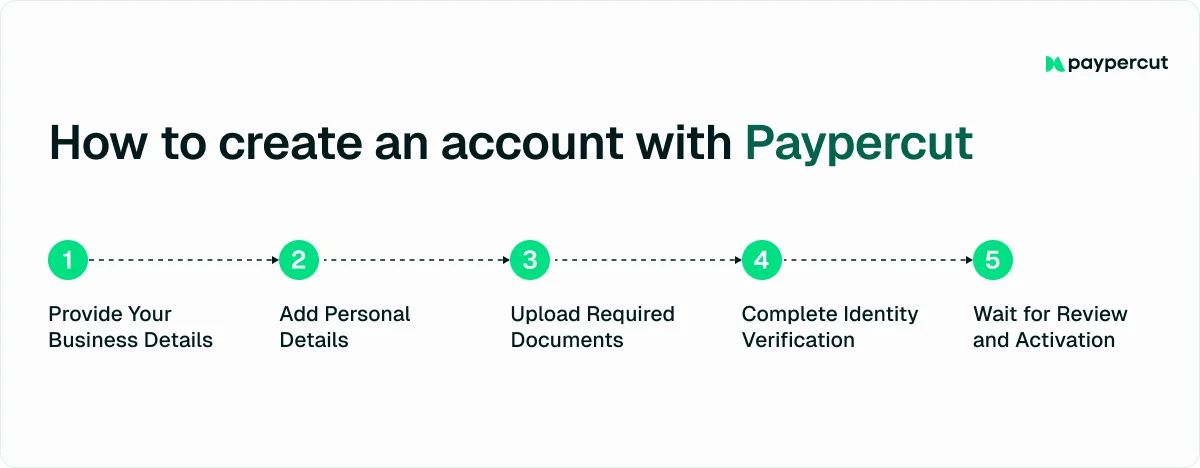
For example, Paypercut’s onboarding typically includes the following steps:
- Add your business details: Enter basic company information such as your legal business name, registration number, contact details, and website so the provider can verify your business.
- Provide representative information: Share details about the person managing or representing the business, including their role within the company.
- Upload verification documents: Submit business and identity documents to confirm company ownership, registration status, and payout information.
- Complete identity verification: Confirm the identity of the business representative through a short verification flow, usually completed on a smartphone.
- Wait for review and approval: The provider reviews your information and documents before activating your account for payments.
Step 3: Access the QR code tools
Once your account is approved, log in to your payment provider’s dashboard and locate the QR payment feature.
Depending on the platform, this may appear under the following tabs:
- Payments
- QR payments
- Платежни линкове
- Checkout tools
- Invoices
The reason why you might find QR code payments under payment links is that these two features are often connected.
Instead of creating a separate payment flow, many providers simply convert an existing payment link into a scannable QR code that customers can open on their phone.
Step 4: Create the payment request
This stage is where you define what the customer will actually pay for after scanning the QR code.
The exact fields will vary between providers, but most platforms will ask you to enter details such as:
- The payment amount
- Currency
- Product or service description
- Invoice or order reference
Some providers also let you decide whether the QR code should be reusable or limited to a single payment.
Reusable QR codes can work well for donations, table payments, or recurring product sales, while single-use QR codes are often a better fit for one-time purchases, event tickets, or individual invoices.
Step 5: Generate the payment code
Once you double-check that all payment details are correct, proceed with generating your QR code.
On most platforms, this simply requires clicking a “Generate QR code” or similar button inside the dashboard.
Step 6: Make sure the QR code is working
Before sharing the QR code with your customer(s), you should test it yourself on one or more mobile devices to make sure the payment flow works as expected. This includes:
- Scanning the code
- Completing a test payment, if possible
- Confirming that the correct payment page, amount, and currency appear after the scan
This is also a good opportunity to check how quickly the payment page loads and whether the mobile experience feels smooth and intuitive.
Given that 36.4% of European mobile users now scan QR codes at least once per week, customers already expect these payment flows to be quick and frictionless.
Step 7: Put the QR code into use
Once the QR code is ready, it’s time to start sharing it with customers.
Depending on your business model, you can display the code in physical locations, send it directly through email or chat, include it on invoices, or add it to digital sales channels.
The table below gives you an overview of some of the most practical ways to use a payment QR code across different business environments:
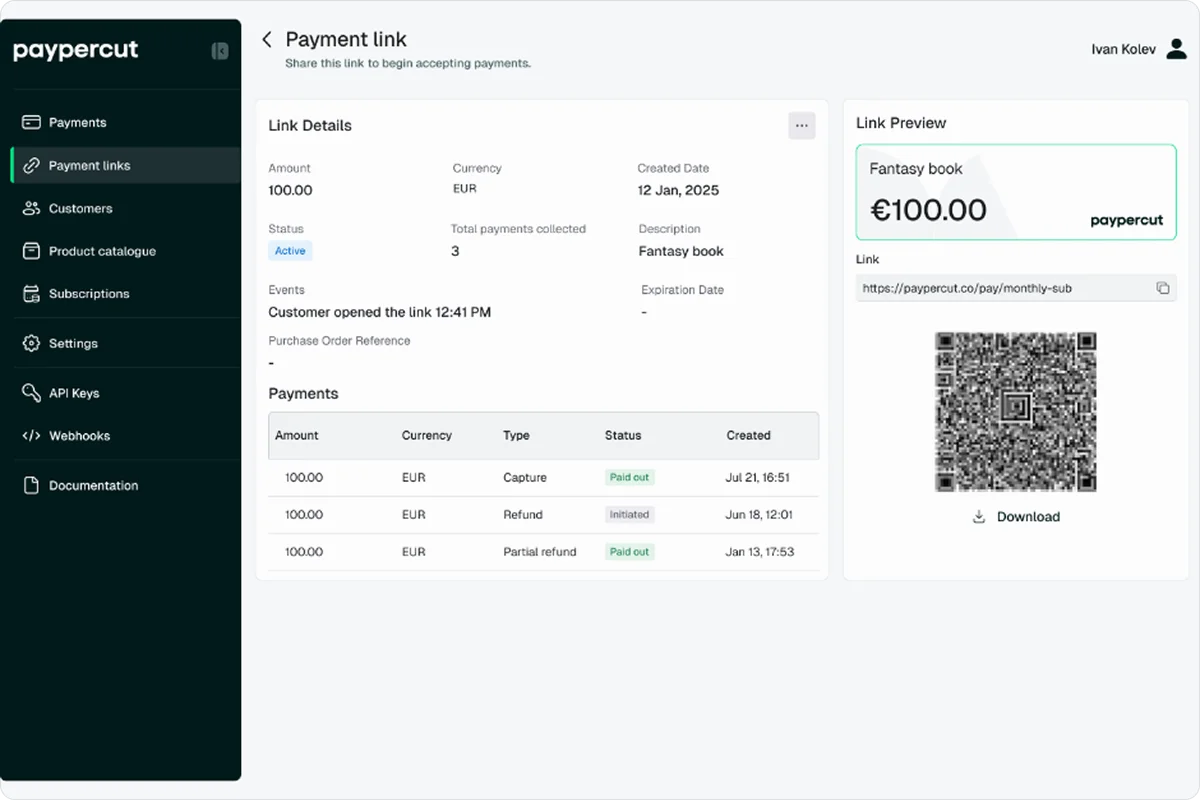
Once the QR code is live, customers can scan it, complete the payment on their phone, and finalize the transaction in just a few taps.
On the merchant side, payments are typically tracked through the provider dashboard, where you can monitor transaction statuses, payment amounts, settlements, and payment activity linked to specific QR codes or payment links.
Some platforms also support notifications, reporting tools, or webhook integrations for more automated payment tracking.
Why choose Paypercut for QR code payments
For many businesses, the hardest part of accepting QR payments is not generating the code itself; it’s managing everything around it.
Payment methods, local checkout expectations, settlement flows, integrations, reporting, and compliance can quickly become operational overhead, especially for smaller teams.
Luckily, Paypercut is designed to simplify this entire process.
Instead of building a custom checkout flow or managing multiple local providers separately, businesses can create payment links and QR codes from one platform and start accepting online and offline payments in minutes.
Payments then settle directly to the business bank account you already use, without requiring a separate banking setup.
Paypercut works especially well for merchants that:
- Sell across multiple European markets
- Need payment links and QR codes without a full website checkout
- Want to offer local payment methods and BNPL options
- Need faster setup without heavy technical work
- Run events, pop-ups, hospitality venues, or service-based businesses
- Need a combination of one-time (single) and reusable QR codes and payment links
Paypercut also automatically adapts the payment experience based on the customer’s market, including local currencies, authentication requirements, and supported payment methods where available. This matters in Europe and CEE, where payment preferences vary significantly between countries.
Beyond QR codes themselves, the platform also includes:
- Hosted checkout flows
- BNPL aggregation
- Recurring billing tools
- API-based payment automation
So, while QR codes may be the starting point, the bigger advantage is having a payment setup that can scale across channels and markets without constantly adding new providers or integrations.
Ready to begin?
Register online and start creating payment links and QR codes directly through Paypercut, or book a 30-minute consultation to discuss the right setup for your business and markets.
FAQ
Can I create a QR code to receive payments?
You can create a QR code to receive payments through payment providers that support QR-based transactions. Most platforms generate the code automatically after you create a payment request or payment link.
How to receive payment via QR code?
To receive payment via QR code, customers scan the code with their smartphone, open the payment page, choose a payment method, and complete the transaction digitally.
Can I generate a QR code myself?
Yes, but there’s a difference between generating a standard QR code and generating one that can process payments. To accept payments, the QR code needs to be connected to a payment provider or payment flow.
Why should we be careful in using QR codes?
Businesses should be careful when using QR codes because scammers can replace legitimate codes with fake ones that redirect customers to fraudulent websites or payment pages. Using trusted payment providers and secure payment flows helps reduce this risk.


